
Installing Charmed Kubernetes
The 'Quick start' documentation explains how to perform a quick and easy general install of Charmed Kubernetes. However, in some cases it may be useful to customise the install:
- Adding additional components
- Configuring storage or networking
- Copying an existing configuration
- Testing a pre-release version
- ...and many more
What you will need
The rest of this page assumes you already have Juju installed and have added credentials for a cloud and bootstrapped a controller.
If you still need to do this, please take a look at the quickstart instructions, or, for custom clouds (OpenStack, MAAS), please consult the Juju documentation.
To install Charmed Kubernetes entirely on your local machine (using containers to create a cluster), please see the separate Localhost instructions.
Quick custom installs
Bundle overlays facilitate common, quick customisations for components such as networking and cloud integration.
Overlay files can be applied when deploying Charmed Kubernetes by specifying them along with the deploy command:
juju deploy charmed-kubernetes --overlay your-overlay.yaml
Sample overlay files are available to download directly from the links here which function with the latest stable charm release. Be advised that you should use only one overlay from each category!
Networking
Cloud integration
You can use multiple overlays (of different types) if required. Note that all
the 'integrator' charms require the use of the --trust option. For example,
to deploy with Canal networking and AWS integration:
juju deploy charmed-kubernetes --overlay aws-overlay.yaml --trust --overlay canal-overlay.yaml
For more detail on overlays and how they work, see the section below.
Get started with your new cluster ›
Deploying a specific Charmed Kubernetes bundle
Charmhub.io hosts the Charmed Kubernetes bundles as well as individual charms. To deploy the latest stable bundle, run the command:
juju deploy charmed-kubernetes
It is also possible to deploy a specific version of the bundle by including the channel argument to select the desired version and risk level. For example, to deploy the Charmed Kubernetes bundle for the Kubernetes 1.25 release, you could run:
juju deploy charmed-kubernetes --channel=1.25/stable
This also applies to channels which have not yet had a stable release, for example:
juju deploy charmed-kubernetes --channel=1.27/beta
Deploying an older Kubernetes version with newer charms
Each Charmed Kubernetes release supports N-2 kubernetes releases. For example, Charmed Kubernetes 1.26 supports 1.26, 1.25, and 1.24 binary versions. Therefore, if you wish to install an older version of Kubernetes you may still be able to do so with the latest stable charms.
Let's say, your project requires Kubernetes 1.24. Build an overlay which adjusts the charm configuration for that revision
applications:
  kubernetes-control-plane:
    options:
      channel: 1.24/stable
  kubernetes-worker:
    options:
      channel: 1.24/stable
and deploy with the 1.26/stable charm bundle
juju deploy charmed-kubernetes --channel=1.26/stable --overlay=1.24_overlay.yaml
It is still possible to deploy older, unsupported versions of Charmed Kubernetes. Older bundle files are available for download in the releases directory of the Charmed Kubernetes repository. These can be downloaded and deployed with Juju as with any local bundle file.
Note: Only the latest three stable versions of Charmed Kubernetes are supported at any time.
Customising the bundle install
A number of the scenarios outlined at the start of this document involved customising the Charmed Kubernetes install. There are two main ways to do this:
- Using overlays in conjunction with the published Charmed Kubernetes bundle.
- Editing the bundle file itself.
Using an overlay means you can easily apply your customisation to different versions of the bundle, with the possible downside that changes in the structure of new versions of Charmed Kubernetes may render your overlay obsolete or non-functional (depending on what exactly your overlay does).
Saving a copy of the bundle file and editing that means that your customisation will always work, but of course, requires that you create a new file for each version of Charmed Kubernetes.
Both methods are described below.
Using overlays
A bundle overlay is a fragment of valid YAML which is dynamically merged on
top of a bundle before deployment, rather like a patch file. The fragment can
contain any additional or alternative YAML which is intelligible to Juju. For
example, to replicate the steps to deploy and connect only the
aws-integrator charm, the following fragment could be used:
applications:
  aws-integrator:
    charm: aws-integrator
    num_units: 1
    trust: true
relations:
  - ['aws-integrator', 'kubernetes-control-plane']
  - ['aws-integrator', 'kubernetes-worker']
Juju's bundle format, and valid YAML are discussed more fully in the Juju documentation. In this example it merely adds a new application, specifying the charm to use, and further specifies the relationships to add.
To use this overlay with the Charmed Kubernetes bundle, it is specified during deploy like this:
juju deploy charmed-kubernetes --overlay ~/path/aws-overlay.yaml --trust
Substitute in the local path and filename to point to your YAML fragment. Note
that this overlay contains charms which require credential access, so you must
use the --trust option to deploy it.
Adding or changing constraints
After adding additional components, the most common use of overlays is to change constraints (the resources requested for the application). Although these are specified already in the Charmed Kubernetes bundle, they can be overridden by an overlay. It isn't necessary to replicate the entirety of an entry, just the parts you wish to change. For example:
kubernetes-worker:
  constraints: cores=4 mem=8G root-disk=100G
  num_units: 6
Changes the machine constraints for Kubernetes workers to add more root disk space, and also deploys six units instead of the three specified in the original bundle.
More information on the constraints you can use is available in the Juju documentation.
Changing configuration values
Configuration settings are mapped to "options" under the charm entries in the bundle
YAML. Usually these are only expressed when they differ from the default value in the
charm. For example, if you look at the fragment for the kubernetes-worker in the
Charmed Kubernetes bundle:
kubernetes-worker:
  annotations:
    gui-x: '100'
    gui-y: '850'
  charm: kubernetes-worker
  constraints: cores=2 mem=8G root-disk=16G
  expose: true
  num_units: 3
  options:
    channel: 1.25/stable
  resources:
    cni-amd64: 0
    cni-arm64: 0
    cni-s390x: 0
    kube-proxy: 0
    kubectl: 0
    kubelet: 0
...there is only one entry under 'options', in this case for the snap channel to use. There are however, a number of configuration options available (more details are in the charm documentation). We can add additional configuration by supplying the desired settings under options. So, for example, where we might do the following through Juju to set some proxy values:
juju config containerd https_proxy=https://proxy.example.com
juju config kubernetes-worker snap_proxy=https://snap-proxy.example.com
... we can instead use the following YAML fragment as an overlay:
containerd:
  options:
    https_proxy: https://proxy.example.com
kubernetes-worker:
  options:
    snap_proxy: https://snap-proxy.example.com
Editing a bundle
Another way to change or customise an install is to store the YAML bundle file locally and edit it with a standard text editor.
The latest version of the Charmed Kubernetes bundle can always be retrieved by fetching the current stable version from Charmhub. For other versions, see the table above.
Care should be taken when editing the YAML file as the format is very strict. For more details on the format used by Juju, see the Juju bundle documentation.
Retrieving a bundle from a running model
Sometimes a more convenient way of getting a local bundle file which matches exactly the deployment you want is simply to save a running model as a bundle. This will preserve configuration, relations and the charms used in the deployment so a structural replica can be recreated.
This can be done simply by running the command:
juju export-bundle --filename mybundle.yaml
The resulting YAML file will be downloaded to the current working directory.
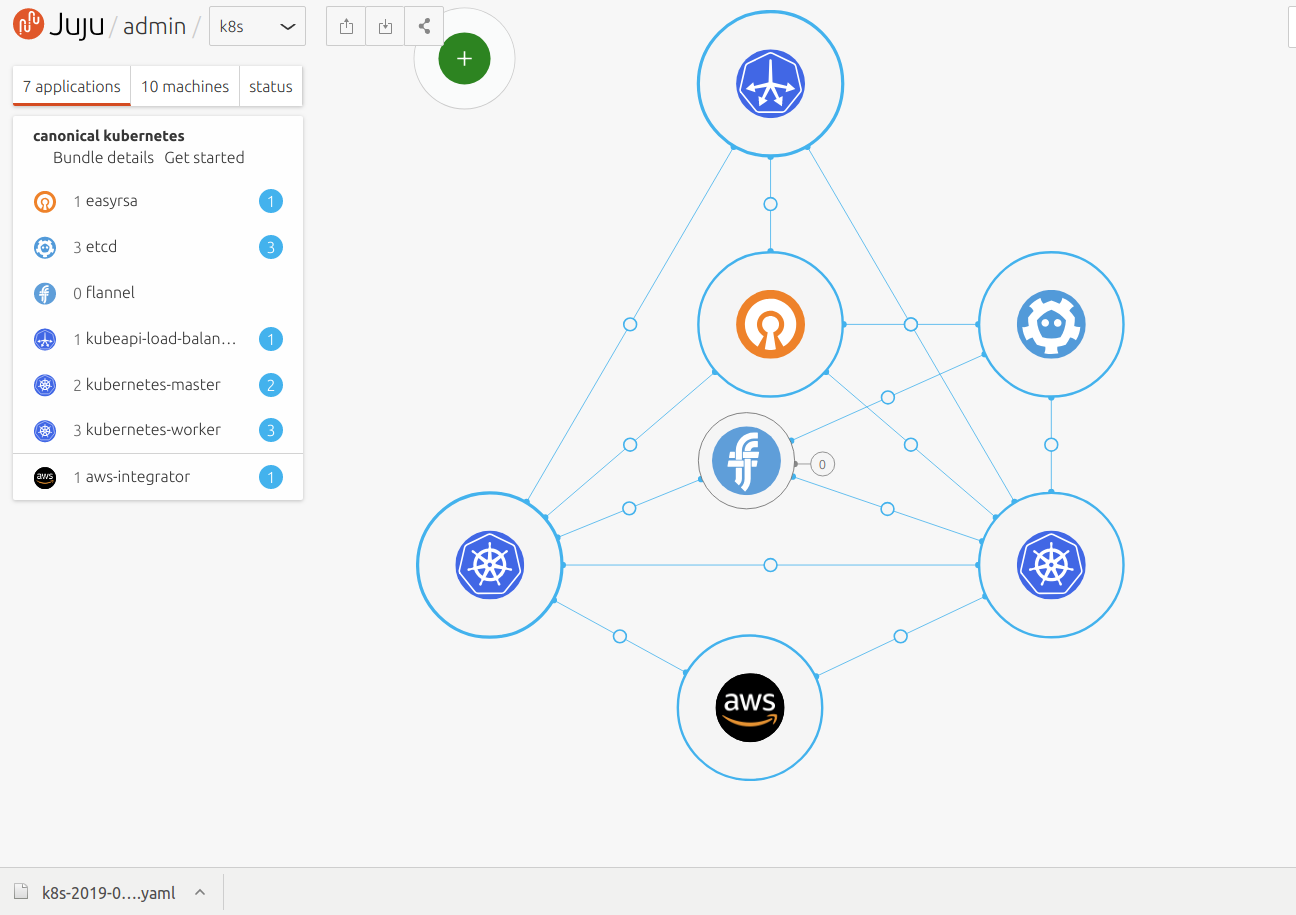
It is also possible to view, edit and export bundles from the Juju GUI:
juju gui
Running this command will output some login information and a URL for the GUI
interface (the GUI actually runs on the Juju controller instance). On visiting
the URL given and logging in, a graphical representation of the current model
will be shown. To export the model as a YAML bundle, click on the Export
button near the top left of the screen.
For more information on the Juju GUI, see the Juju documentation.
Next Steps
Now you have a cluster up and running, check out the Operations guide for how to use it!
See the guide to contributing or discuss these docs in our public Mattermost channel.